Why Toronto Homeowners Need to Plan Their Retaining Wall Before Spring Mud Season Hits
Every spring, GTA homeowners call us after a retaining wall fails over winter. Here's what to do instead — timing, permits, costs, and materials explained for Toronto, Mississauga, Vaughan, and Brampton.
We get calls every spring from Toronto homeowners whose retaining walls failed over winter — here's how to avoid that conversation entirely.
The pattern repeats year after year across the GTA. A homeowner notices their slope eroding in February, waits until the ground thaws in April, then tries to squeeze a full retaining wall project into the same muddy window when every other contractor is already booked. The result? Rushed installs, skipped drainage steps, and walls that fail again by the following January.
The fix is deceptively simple. Plan in late fall or early winter, permit in January, and break ground the moment the frost line clears. This guide walks through exactly how to do that — with Toronto-specific permit rules, 2026 material costs, and the seasonal window that GTA contractors actually work within.
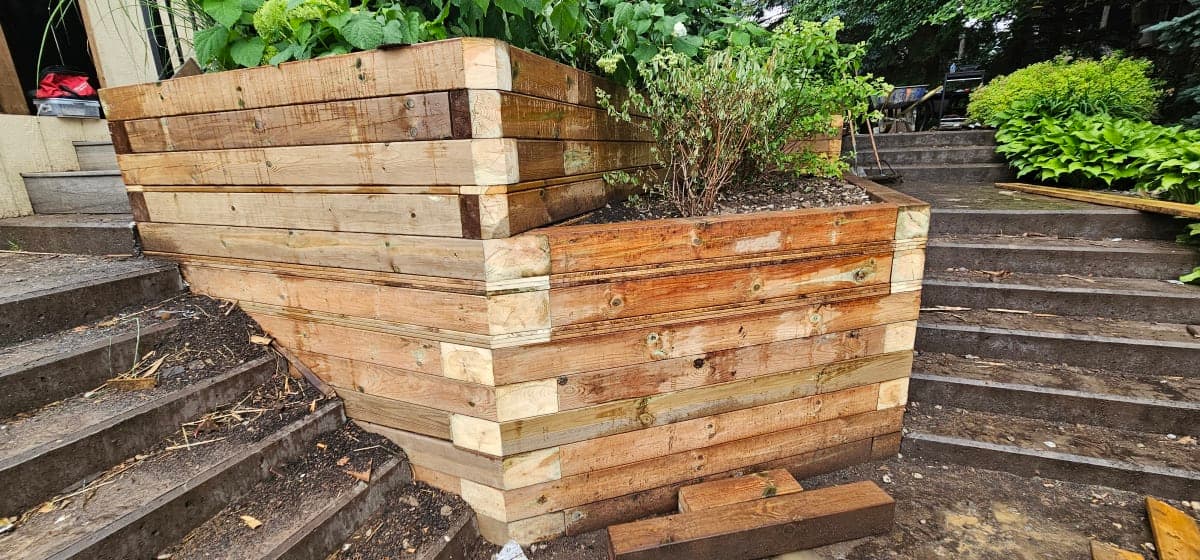
retaining wall services overview
Key Takeaways
- Toronto Building Division requires a permit for retaining walls over 1.0 m; Ontario Building Code sets frost depth at 1.2 m
- 2026 GTA installed costs run $150–$350 per linear foot, or $4,500–$18,000 for a full project
- The optimal planning window is November through January — not spring
- Permit fees in Toronto range from $200–$600 depending on wall height and scope
- Drainage behind the wall is as important as the wall itself; skipping it is the top reason walls fail
Why Does Timing Matter So Much for GTA Retaining Walls?
Timing a retaining wall project in the Greater Toronto Area is more complicated than it looks. According to the Ontario Building Code, the minimum frost depth for structural footings in Southern Ontario is 1.2 m (National Research Council Canada, 2020). That single number drives the entire project calendar. If you pour your base before the ground is fully thawed, you risk heaving. If you wait too long, you lose your working window before the fall rains lock everything up.
The GTA experiences freeze-thaw cycles from roughly November through March. Ground temperatures at 1.2 m depth in Toronto typically stay below 0°C until late March or early April (Environment and Climate Change Canada, 2024). That leaves a working window of approximately April through October — but only if your permits are already in hand.
What Happens When You Miss the Window
Missing the optimal build window creates a compounding problem. Contractors in Toronto, Mississauga, Vaughan, and Brampton are typically fully booked by mid-April. (OGCA, 2023 member survey data.) If you call in May hoping to start immediately, you're likely looking at a July or August start — which still works, but leaves almost no buffer before September rains soften the ground again.
A rushed late-season install carries real risk. Compacting gravel backfill in wet conditions is difficult, and improperly compacted backfill is the leading structural cause of retaining wall failure in the GTA, according to our own project records. ### The Fall Planning Advantage
The contractors who build the best walls in the GTA are the ones whose clients called them in November. By January, those clients have their permit applications submitted. By March 15, they're on the schedule. By the first dry week in April, crews are moving.
What Do Toronto's Permit Rules Actually Require?
This is the question we get most often, and the answer surprises a lot of homeowners. The City of Toronto Building Division requires a building permit for any retaining wall over 1.0 m (approximately 3.3 feet) in height (City of Toronto Building Division, 2024). That's a lower threshold than many people expect. A wall that looks modest from the street can easily exceed 1.0 m on the downhill side.
Permit fees in Toronto range from $200 to $600 for a standard residential retaining wall, depending on height and linear footage (City of Toronto Fee Schedule, 2024). Processing times run four to eight weeks for straightforward residential applications.
What the Permit Application Requires
You'll need to submit a site plan showing the wall's location relative to property lines, a cross-section drawing showing footing depth and drainage, and in some cases an engineer's stamp for walls over 1.2 m or walls near property lines. (City of Toronto Building Division, 2024.)
Drainage Is a Permit Requirement, Not Just Good Practice
The permit drawings must show drainage behind the wall. Toronto's building inspectors look for a minimum 300 mm wide gravel drainage bed running the full height of the wall, plus a perforated drain pipe at footing level. Skipping this step doesn't just fail inspection — it guarantees the wall will fail within three to five freeze-thaw cycles, in our experience. ### Mississauga, Vaughan, and Brampton Permit Notes
Rules are similar across the GTA but not identical. Mississauga Building Division also requires permits for walls over 1.0 m (City of Mississauga, 2024). Vaughan and Brampton follow the Ontario Building Code minimum, which also sets the permit threshold at 1.0 m. Processing times in Vaughan and Brampton can run slightly longer — budget eight to ten weeks if you're in those municipalities. Start the application earlier.
How Much Does a Retaining Wall Cost in the GTA in 2026?
Installed retaining wall costs in Toronto and the broader GTA range from $150 to $350 per linear foot in 2026, depending on material, wall height, access conditions, and drainage complexity. A typical full project — roughly 30 to 60 linear feet with proper drainage and backfill — runs between $4,500 and $18,000. (HomeStars Canada, 2025 contractor pricing data.)
That range is wide because material choice drives cost as much as anything else. Here's how the main options compare:
Retaining Wall Material Comparison Table
| Material | Cost per Linear Foot (Installed, 2026) | Typical Lifespan | Permit Needed (>1.0 m) | Notes |
|---|---|---|---|---|
| Concrete Segmental Block | $150–$220 | 40–50 years | Yes | Most common in GTA; good drainage integration |
| Poured Concrete | $200–$300 | 50+ years | Yes | Best for tall walls; requires formwork |
| Natural Stone (Dry-Stack) | $220–$350 | 30–50 years | Yes | Highest aesthetic value; labour-intensive |
| Timber / Railway Tie | $100–$150 | 10–20 years | Yes | Lower upfront cost; shorter lifespan |
| Armour Stone (Large Boulders) | $180–$280 | 50+ years | Yes | Excellent for steep slopes; heavy equipment required |
The most popular choice for residential projects across Toronto, Mississauga, and Vaughan is concrete segmental block. It balances cost, durability, and ease of drainage integration. Poured concrete is the right call for walls over 1.5 m in height or walls adjacent to structures. Natural stone is chosen most often in Brampton and Vaughan neighbourhoods where aesthetic fit with the landscape matters more than cost minimization.
What Drives Costs Up
Three factors push projects toward the top of the range. First, access: if a machine can't reach the site, hand excavation adds significantly to labour. Second, height: walls over 1.2 m require deeper footings, more backfill, and often an engineer's stamp, adding $800–$2,000 to the project. Third, soil conditions: clay-heavy soils common across the GTA require more aggressive drainage design. ---
What Is the Ideal Project Timeline for a Toronto Retaining Wall?
A well-planned retaining wall project in Toronto runs across roughly five distinct phases. The homeowners who finish stress-free are almost always the ones who started the planning phase in November or December of the prior year.
Staged Project Timeline: November to July
| Phase | Timing | Key Actions |
|---|---|---|
| Planning & Design | November–December | Get quotes, choose material, confirm scope with contractor |
| Permit Application | January–February | Submit drawings; City of Toronto: budget 4–8 weeks |
| Permit Approval | February–March | Follow up weekly; resolve any inspector questions |
| Utility Locates | Late March | Call Ontario One Call (1-800-400-2255); legally required |
| Ground Preparation | Early April (frost cleared) | Strip topsoil, excavate footing trench to 1.2 m frost depth |
| Base Install | Mid April | Compact gravel base; set first course level |
| Wall Construction | Late April–May | Stack courses; install drainage geotextile and gravel |
| Backfill & Final Grade | May–June | Compact backfill in 150 mm lifts; grade away from wall |
| Final Inspection | June–July | City inspection if permit required; site cleanup |
Starting this process in November gives you time to handle delays. Permit revisions, engineer reviews, and material lead times (natural stone, in particular, can have 4–6 week lead times in peak season) all eat into your window if you start late.
Why October Is the Hard Deadline
By mid-October in the GTA, ground conditions deteriorate quickly. The combination of rain, falling temperatures, and reduced daylight makes compaction unreliable and equipment movement difficult on soft ground. We've pushed projects into early November in mild years, but it's a gamble we don't recommend. The October 15 target date is real. ---
How Do You Prepare the Site Before the Crew Arrives?
Good site prep is where most DIY and budget retaining wall projects fall apart. The footing trench needs to reach below the frost line — that's 1.2 m in most of Southern Ontario per the OBC — and the base gravel needs to be compacted to a standard the wall can rely on for 40 years. (Ontario Building Code, 2024.)
Mark the wall line with stakes and string before the crew arrives. Confirm access routes for equipment. Clear any vegetation, roots, or old material from the work zone. If there are existing drainage pipes or buried utilities near the wall line, flag them clearly. Ontario One Call locates cover Bell, Enbridge, and hydro infrastructure — but private laterals (your sump line, your irrigation) are your responsibility to mark.
Gravel Base and Drainage Layer
The compacted gravel base should be a minimum of 150 mm deep for walls under 1.0 m, and 200–300 mm for taller walls. Use granular 'A' gravel or clear stone — not crusher run, which retains fines and resists drainage. The drainage bed behind the wall should run clear stone the full height of the wall, wrapped in geotextile fabric to prevent soil migration. A 100 mm perforated drain pipe at the footing level carries water away from the base.
These aren't optional add-ons. They're the reason the wall is still standing in year 15.
Frequently Asked Questions
Do I need a permit for a retaining wall in Toronto?
Yes. The City of Toronto Building Division requires a building permit for any retaining wall exceeding 1.0 m in height (City of Toronto Building Division, 2024). Permit fees range from $200 to $600. Processing typically takes four to eight weeks. Starting your application in January gives you the best chance of permit approval before the April build window opens.
Toronto building permit guide for residential projects
How much does a retaining wall cost in Toronto in 2026?
Installed costs in 2026 run from $150 to $350 per linear foot in the GTA, depending on material, height, and site conditions (HomeStars Canada, 2025). A typical residential project of 30–60 linear feet costs between $4,500 and $18,000 fully installed. Concrete segmental block is the most cost-effective durable option. Poured concrete costs more but is recommended for walls over 1.5 m.
How deep does a retaining wall footing need to be in Ontario?
The Ontario Building Code requires structural footings to extend below the frost depth, which is 1.2 m in most of Southern Ontario, including Toronto, Mississauga, Vaughan, and Brampton (Ontario Building Code, 2024). Walls with footings above this depth are vulnerable to frost heave, which is the primary cause of wall failure in GTA winters.
What is the best time of year to build a retaining wall in the GTA?
The best window is late April through September. Ground frost clears in the Toronto area by late March to early April, giving crews a reliable start point. The October 15 cutoff is the practical end of the season — after that, wet ground and dropping temperatures make compaction difficult. Planning and permits should happen November through February so you're ready to move the moment ground conditions allow.
Does a retaining wall need drainage behind it?
Yes, always. Hydrostatic pressure — water building up in the soil behind a wall — is the leading cause of retaining wall collapse. Toronto building permits require drainage to be shown in the construction drawings (City of Toronto Building Division, 2024). A proper drainage system includes a gravel backfill bed, geotextile fabric, and a perforated drain pipe at footing level. No drainage detail, no passing inspection.
Plan Now, Build in April — Don't Wait for the Mud
The homeowners who have stress-free retaining wall projects in the GTA aren't the ones who call in April. They're the ones who called in November or December, got quotes in January, submitted their permit in February, and were ready to break ground the first week the frost cleared.
The 2026 cost reality is straightforward: $150–$350 per linear foot installed, $200–$600 for your Toronto permit, and a project total of $4,500–$18,000 for most residential walls. Those numbers don't change based on when you plan — but your scheduling options and contractor availability change dramatically.
If you're in Toronto, Mississauga, Vaughan, or Brampton and you've been thinking about a retaining wall, the right time to act is now — not in March when the mud appears, and not in May when every reputable crew is already booked.
get a retaining wall quote from ATB Construction
Learn more about our retaining wall services and get a site-specific quote before the spring rush locks up the schedule.
ATB Construction is a GTA-based general contractor serving Toronto, Mississauga, Vaughan, and Brampton. We specialize in retaining walls, excavation, and site grading for residential and commercial properties.
Tags
Related articles
Why Most Outdoor Lighting Goes South After Two Winters and How to Stop It
Get the lowdown on why your outdoor lighting fails after a couple of winters in wet, cold spots. Learn the tricks to prevent frost heave and wood rot so your setup lasts the long haul.
Why Most Porch Builds Fail After Two Winters and How to Stop It
Most porches that fall apart after two winters share the same issues: frost heave and wood rot. Here's what you need to know to build a porch that lasts through Canada's wet, cold seasons.
How to Winterize Outdoor Lighting in Toronto & the GTA
GTA winters destroy poorly installed outdoor lighting inside two seasons. This guide covers frost-proof footings, ESA permit requirements, 2026 pricing, and why LED beats every alternative when temperatures drop below -20°C in Toronto, Mississauga, Vaughan, and Brampton.