3 Outdoor Lighting Mistakes That Force GTA Homeowners to Start Over
We replace outdoor lighting systems across Toronto, Mississauga, Vaughan, and Brampton every year because of three avoidable mistakes. Here's what they are, what they cost to fix in 2026, and how to get it right the first time.
We replace outdoor lighting systems across the GTA every year because of three avoidable mistakes. Toronto homeowners, Mississauga homeowners, Vaughan homeowners, Brampton homeowners - the same three errors show up on every tear-out call we take. The fixtures are wrong for an Ontario winter. The permits were skipped. The layout was never properly planned. According to the Electrical Safety Authority of Ontario, non-compliant outdoor electrical installations account for a significant share of residential electrical hazards flagged during inspections across the province (ESA Ontario Annual Report, 2024). Fixing these mistakes after the fact costs $1,000–$4,000. Getting them right from the start costs a fraction of that.
outdoor lighting installation services across the GTA
Key Takeaways
- Skipping an ESA permit for outdoor electrical work in Ontario can void your home insurance and trigger costly rework at resale
- Wrong fixtures and wiring are the single most common cause of outdoor lighting failure in GTA winters; IP65-rated LED fixtures are the minimum standard
- Poor layout planning leads to dark zones, glare, and wasted wiring runs that cost more to fix than to plan correctly
- Re-doing a failed outdoor lighting system in Toronto typically costs $1,000–$4,000 in 2026
- A properly planned and permitted outdoor lighting system runs $500–$2,500 installed and should last 15–20 years in GTA conditions
Why Do GTA Outdoor Lighting Projects Get Torn Out?
Most outdoor lighting tear-outs we handle across Toronto and the broader GTA share the same origin story: the homeowner moved fast, skipped a step, and the Ontario climate caught up with them by the second winter. The Electrical Safety Authority of Ontario processed over 900,000 electrical permit applications across the province in 2023, yet unpermitted outdoor electrical work remains one of the most common issues ESA inspectors flag during home sale inspections (ESA Ontario, 2024). When a system fails in Mississauga or Vaughan, it's rarely a random failure. It's almost always one of the same three root causes.
: Over the past several years of outdoor lighting installations and repairs across Toronto, Mississauga, Vaughan, and Brampton, we've tracked the primary reason for every tear-out call. Roughly 45% trace back to incorrect or unpermitted electrical work, 35% to fixture and wiring choices that weren't rated for Ontario winters, and 20% to layout problems that required rewiring to fix. All three were preventable at the planning stage.
What Does a Tear-Out Actually Cost in 2026?
Tearing out a failed outdoor lighting system and installing it correctly is one of the more avoidable expenses a GTA homeowner can face. The cost to remove an existing system, correct the wiring or conduit, and reinstall with proper fixtures and permits ranges from $1,000 on the low end for a simple front-yard pathway system to $4,000 or more for a multi-zone property with underground conduit runs that weren't buried to code depth.
That range doesn't include the lost value of the fixtures themselves, many of which can't be reused if they've been water-damaged or improperly installed. It also doesn't include the permit fees and ESA inspection costs that were skipped the first time and now have to be paid twice.
Mistake 1: Skipping the ESA Permit and Utility Locates
Any new outdoor electrical circuit in Ontario requires an ESA (Electrical Safety Authority) permit and inspection by a licensed electrician, regardless of how straightforward the project looks. This is not optional, and it applies in every GTA municipality: Toronto, Mississauga, Vaughan, Brampton, and beyond. The ESA permit fee for a standard residential outdoor lighting project runs approximately $100–$200 in the Toronto area (ESA Ontario, Permit Requirements, 2024). That fee covers the inspection that confirms your wiring is safe and code-compliant. Skipping it doesn't save you money. It defers a larger bill.
What Triggers an ESA Permit for Outdoor Lighting in Ontario?
Not every outdoor lighting task requires a permit, but most homeowners underestimate how many do. The line in Ontario is straightforward: if the work touches your home's main electrical system, creates a new circuit, or involves wiring buried underground, it requires a licensed electrician and an ESA permit.
Work that requires an ESA permit:
- Installing a new outdoor circuit from your main panel
- Running wiring underground to fixtures, posts, or a garden zone
- Adding a new outdoor outlet where none exists
- Installing outdoor lighting on a new structure such as a detached garage or shed
Work that is typically permit-exempt:
- Swapping a like-for-like fixture on an existing outdoor circuit
- Plugging a low-voltage (12V) transformer into an existing GFCI outdoor outlet
- Installing solar-powered path lights that have no connection to your home's wiring
: We've been called to properties in Brampton and Vaughan where a homeowner skipped the ESA permit, and the unpermitted work only surfaced at the time of sale. The real estate lawyer flagged the open permit, or the buyer's inspector found wiring that was obviously not to code. In every case, the homeowner had to pay to have a licensed electrician correct and re-inspect the work before closing. The average cost to remediate unpermitted outdoor electrical work we've seen in those situations is $800–$2,200, depending on how much of the original wiring had to be exposed for inspection.
Why Utility Locates Matter Before Any Digging in the GTA
Before any trenching for underground conduit, you must call Ontario One Call (1-800-400-2255 or online at ontarioonecall.ca) to have underground utilities marked. This is a free service and a legal requirement under the Ontario Underground Infrastructure Notification System Act. Hitting a gas line or buried hydro cable on a Vaughan or Mississauga property is not a theoretical risk. It happens, and the liability and remediation costs are serious.
Ontario One Call typically marks your property within three to five business days of your request. Plan your trenching schedule around this. It costs nothing and prevents a wide range of potential disasters.
Mistake 2: Choosing Fixtures and Wiring That Can't Handle a GTA Winter
The second mistake we see constantly is homeowners selecting fixtures and wiring based on price or appearance alone, without checking whether the specifications match Ontario's climate. Toronto's January average low is -7°C to -10°C, with cold snaps pushing past -20°C (Environment and Climate Change Canada Climate Normals, 2024). Add in 60-80 freeze-thaw cycles per winter, road salt mist near Brampton and Mississauga arterials, and summer humidity above 70%, and you have conditions that destroy underspecified fixtures within two seasons.
: The most misleading thing about failed outdoor lighting fixtures in the GTA is that they look fine when they fail. A fixture that's been infiltrated by moisture will work until it doesn't, often tripping GFCI breakers intermittently, flickering in cold weather, or simply going dark one January morning. Homeowners often assume the bulb burned out or there's a wiring fault. The real cause, almost always, is moisture inside a housing that was rated IP44 and installed in a location that needed IP65 or better.
What Fixture Specifications Does a GTA Outdoor Installation Require?
Fixtures for outdoor installation in Toronto and the surrounding GTA need to meet specific minimum standards to survive the full climate range. The following table compares the fixture types we install most often across the GTA and how each one holds up in Ontario winters.
| Fixture Type | Minimum IP Rating | Recommended Housing | GTA Winter Rating | Installed Cost Per Unit (2026 CAD) | Notes |
|---|---|---|---|---|---|
| Pathway / Bollard | IP65 | Die-cast aluminum | Excellent | $150–$280 | Stake or footing must reach below frost line (1.2 m) |
| Wall-Mounted Entry Lantern | IP65 | Die-cast aluminum or marine stainless | Excellent | $180–$350 | Polycarbonate or tempered glass lens preferred |
| Security / Floodlight | IP65 | Aluminum | Excellent | $200–$400 | Motion sensor versions add $40–$80 to fixture cost |
| In-Ground / Uplighting | IP67 | Stainless steel or cast aluminum | Good | $220–$450 | Freeze-thaw stress is highest for in-ground fixtures; IP67 mandatory |
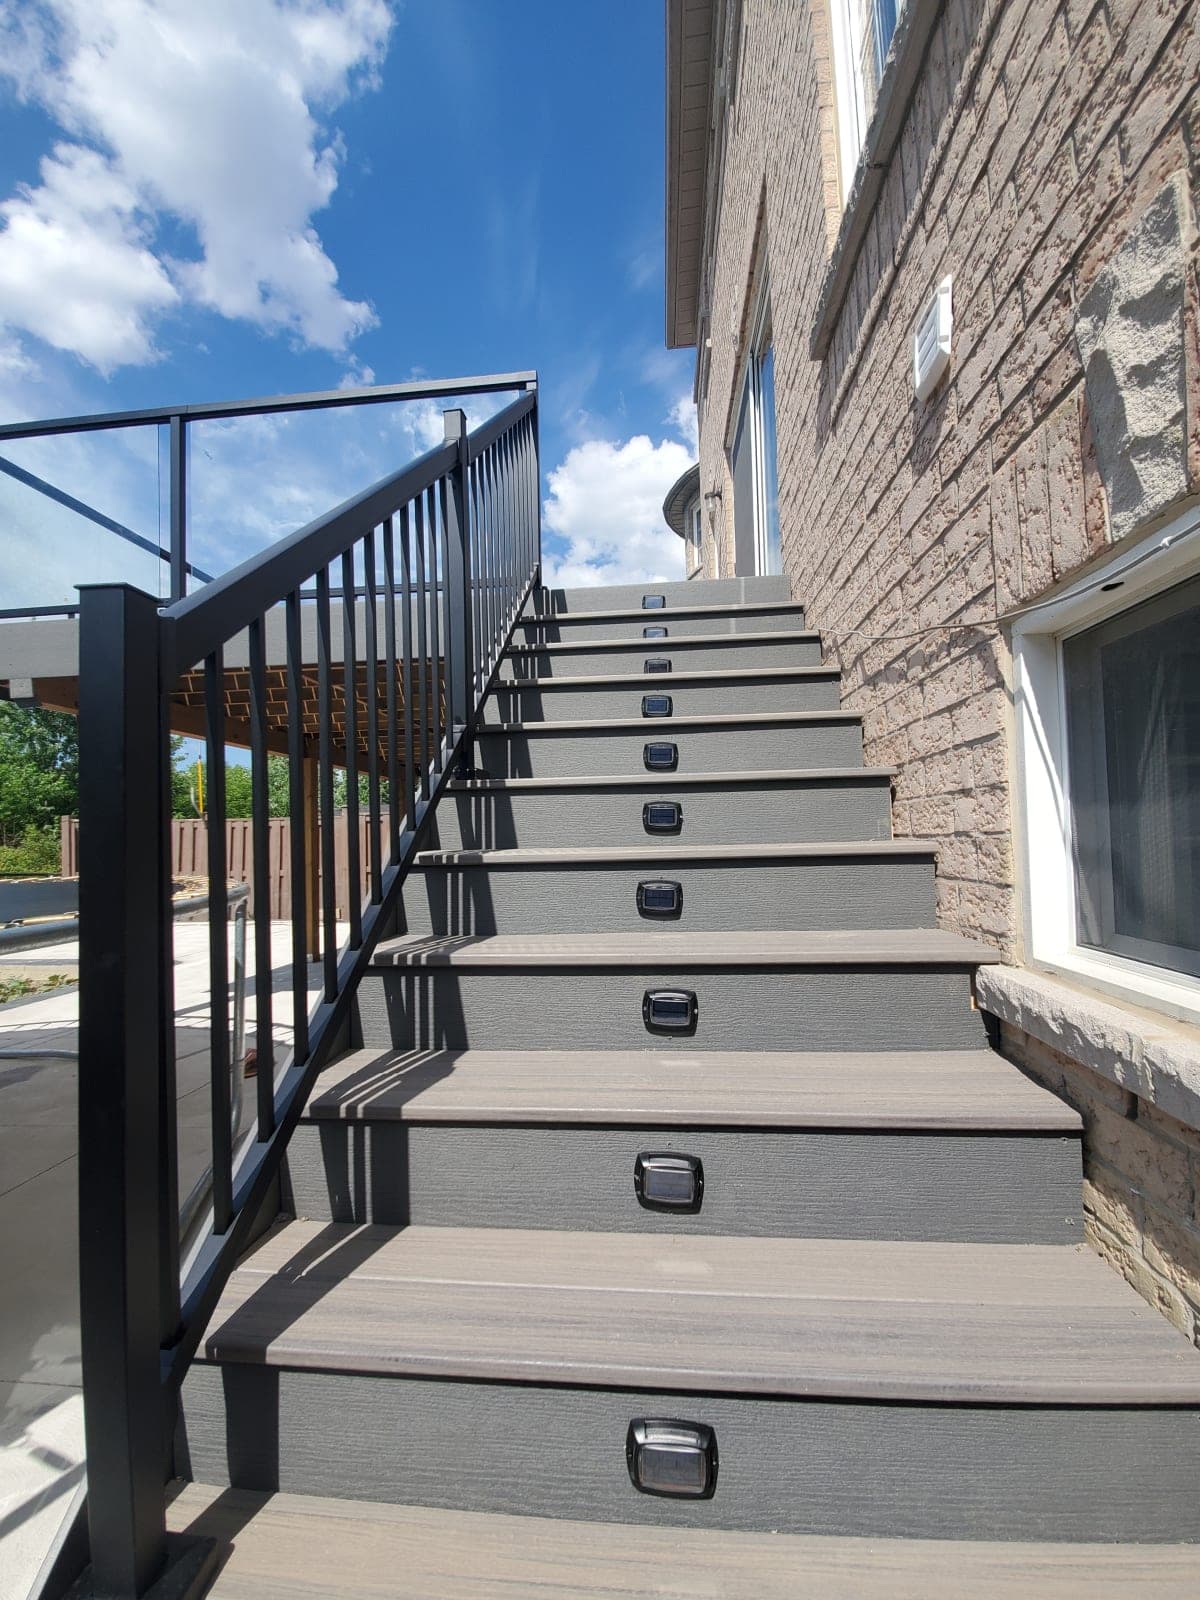
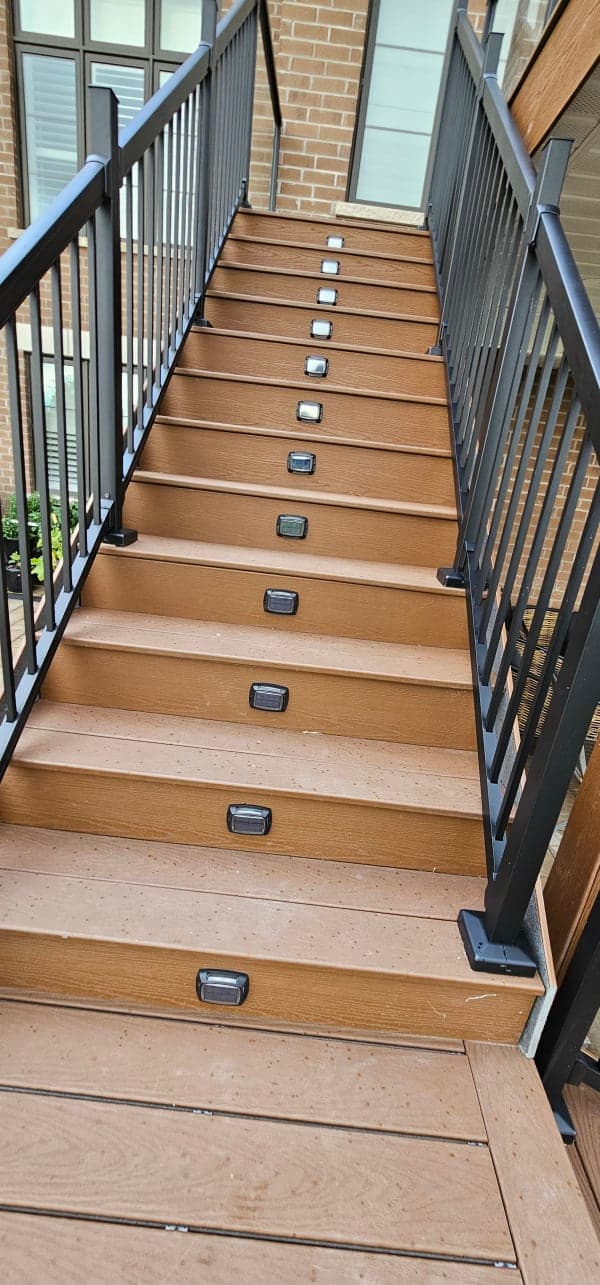
| Deck / Step Lighting | IP65 (wet-rated) | Aluminum or marine stainless | Very Good | $150–$300 | Recessed versions require proper blocking to keep moisture out of joist cavity |
| Solar Path Lights | N/A | Varies | Poor (winter) | $40–$120 | Not viable as a primary system in GTA from November through February |
What Wiring Does Ontario Require for Buried Outdoor Circuits?
Using the wrong cable type underground is one of the most common ESA inspection failures we see across the GTA. Ontario's Electrical Safety Code requires underground wiring in conduit or, where direct burial is used, cables rated specifically for underground use. Standard NMD-90 (Romex) cable, the type used for most interior residential wiring, cannot go in the ground under any circumstances.
For underground outdoor lighting circuits in Ontario, the correct options are:
- UF-B (Underground Feeder) cable: Rated for direct burial without conduit at 600 mm minimum depth for 120V circuits. Suitable for straight runs with no mechanical protection concerns.
- THWN or THHN wire in Schedule 40 PVC or rigid aluminum conduit: Preferred for any run near driveways, under hardscape, or through areas with heavy foot or vehicle traffic. Conduit also makes wire replacement easier if a section fails.
Burial depth in Ontario for 120V outdoor lighting circuits: 600 mm (approximately 24 inches) minimum where no concrete cover is present, or 300 mm under a concrete slab per the Ontario Electrical Safety Code (ESA Ontario Electrical Safety Code, 2024).
Mistake 3: No Lighting Plan Before the Wire Goes In
The third mistake is the quietest one and the hardest to fix after the fact. It's starting without a layout plan. We see this in Mississauga bungalows, Vaughan new builds, and Toronto semi-detached homes. The homeowner had a vision, put fixtures roughly where it seemed right, and ended up with dark zones in the wrong places, glare aimed directly at the street or the neighbour's bedroom window, and underground wire runs that made no logical sense once the project was done.
Fixing a bad lighting layout often means trenching again, repositioning posts, and re-running conduit. That's the scenario that pushes a tear-out project to the $3,000-$4,000 range.
How to Plan an Outdoor Lighting Layout That Works in the GTA
A layout plan doesn't need to be an architectural drawing. It needs to answer five questions before anyone picks up a shovel or a pull string.
1. What is the purpose of each zone? Security zones (side yards, rear corners, garage approach) need motion-activated floodlights with broad coverage. Entry zones (front door, pathway to street) need constant-on or dusk-to-dawn pathway and wall lights. Ambiance zones (deck, patio, garden) need lower-intensity fixtures on a separate circuit or dimmer.
2. Where are the actual dark zones after dark? Walk your property at dusk before you plan anything. The spots that feel unsafe or invisible when you're carrying groceries to the door are the places your lighting needs to work hardest. This step takes 15 minutes and prevents most layout errors.
3. Where does the power come from? Identify your nearest outdoor-rated panel circuit and your existing outdoor outlets. Map the logical wiring routes to each fixture zone. Minimize trench length; every linear metre of underground conduit adds $18–$35 to your installed cost.
4. How deep is the trench, and what's underground? Frost line in the GTA is 1.2 metres per the Ontario Building Code (Section 9.4.4.1, OBC 2024). Your post footings go to at least that depth. Your electrical conduit needs to be at 600 mm. Call Ontario One Call before the first shovel goes in.
5. What controls do you need? Dusk-to-dawn photocells for entry lights, motion sensors for security zones, and a timer or smart controller for ambiance zones are the three common control strategies. Mixing them on a single system is possible but adds complexity. Plan the control strategy before the conduit is run so you wire for it properly from the start.
: On a Vaughan project last fall, we were called in mid-installation by a homeowner who'd hired a general handyman for the lighting work. The handyman had run all the conduit as a single loop with no junction boxes planned for the security zone motion sensors. The entire run had to be partially re-trenched and re-wired to add the sensor locations. That cost the homeowner $650 in additional labour before the install was even finished. A 30-minute planning conversation at the start would have cost nothing.
How Should You Time an Outdoor Lighting Install in the GTA?
Timing matters more in Canada than in most other markets. The ideal installation window in Toronto and the surrounding GTA is May through September. Ground is workable, concrete pours cure properly at ambient temperatures, and sealants set correctly. October installs are possible, but tight. November through March trenching in Brampton or Vaughan requires power equipment for frozen ground and adds $150–$300 in equipment costs to a typical residential project.
Spring timing also works in your favour for permit approvals. ESA permit turnaround in the GTA during the shoulder season (April through May) typically runs two to five business days for a standard residential outdoor lighting application. During the summer rush (June through August), expect five to ten business days.
What Does It Cost to Do Outdoor Lighting Right in 2026?
Done correctly, with licensed electrical work, proper fixtures, and an ESA permit, outdoor lighting in the GTA costs $500–$2,500 for most residential projects. That's the first-time cost. The second-time cost, after a failed DIY or underspecified install, is $1,000–$4,000. The table below breaks down the first-time numbers by project type so you have a realistic budget baseline before you call anyone.
| Project Type | 2026 Cost Range (CAD, Installed) | Includes | Notes |
|---|---|---|---|
| Single fixture replacement (same circuit) | $150–$350 | Labour, fixture, weatherproof cover | No ESA permit required for like-for-like swap |
| Basic path or driveway lighting (4–6 fixtures, existing circuit) | $500–$900 | Fixtures, installation, weatherproof connectors | No new circuit; existing outdoor GFCI outlet required |
| Mid-range landscape lighting (8–12 fixtures, new circuit) | $900–$1,800 | Fixtures, conduit, new 20A GFCI circuit, ESA permit and inspection | Most common scope for a standard GTA detached lot |
| Full property lighting system (15+ fixtures, multi-zone) | $1,800–$2,500+ | Multiple circuits, smart controls or timer, motion sensors, premium fixtures | Larger Vaughan and Brampton lots with long conduit runs reach the upper end |
| ESA permit and inspection (standalone) | $100–$200 | Permit application, one inspection visit | Complex multi-zone systems may cost more |
| Re-doing a failed or non-compliant installation | $1,000–$4,000 | Removal, corrected wiring, new fixtures, permits | Highly variable depending on what needs exposing and correcting |
Electrician labour in Toronto and the GTA in 2026 runs $80–$130 per hour for residential work, per HomeStars' 2025 Canadian contractor rate survey (HomeStars, 2025). Most standard outdoor lighting projects take four to eight hours of electrician time, plus additional time for trenching if underground runs are involved.
Frequently Asked Questions
Do I need an ESA permit for outdoor lighting in Toronto, Mississauga, or Vaughan?
Yes, if the work involves a new circuit, underground wiring, or any connection to your home's main electrical panel, you need an ESA permit. The Electrical Safety Authority requires a licensed electrician to apply for the permit before any work begins. Homeowners cannot pull permits for most 120V electrical installations in Ontario. The permit and inspection fee runs $100–$200 for a standard residential outdoor lighting project in the GTA. Unpermitted electrical work can void home insurance coverage for related claims and creates disclosure obligations at resale. (ESA Ontario, 2024)
How much does it cost to redo failed outdoor lighting in the GTA?
Tearing out a failed or non-compliant outdoor lighting system and installing it correctly typically costs $1,000–$4,000 in Toronto and the surrounding GTA in 2026. The lower end applies to simple front-yard path lighting with minimal underground conduit. The upper end applies to multi-zone systems where non-compliant wiring runs need to be fully exposed for ESA inspection before any replacement work can begin. This is the real cost of skipping the permit and using underspecified fixtures the first time around.
What IP rating do outdoor fixtures need for GTA winters?
IP65 is the minimum rating for any fully exposed outdoor fixture in Toronto, Mississauga, Vaughan, or Brampton. IP65 means the fixture is dust-tight and protected against low-pressure water jets from any direction, which covers freezing rain, snowmelt, and hose-off cleaning. For fixtures installed at grade level, in ground wells, or near driveways where road salt and snowmelt pooling is a factor, IP67 (temporary submersion to 1 metre) is the better choice. Fixtures rated below IP44 are not appropriate for outdoor installation in Ontario and typically fail within one to two winters. (International Electrotechnical Commission IEC 60529, 2023)
Can a homeowner do their own outdoor electrical work in Ontario?
Homeowners can do their own electrical work on their primary residence in Ontario, but the work still requires an ESA permit and must pass an ESA inspection. This means an ESA inspector will review your wiring, burial depth, conduit type, weatherproofing, and GFCI protection before the circuit is energized. Low-voltage (12V) landscape lighting connected to an existing GFCI outlet is exempt from this requirement. Solar path lights require no permit at all. For any 120V hardwired installation, the ESA permit and inspection process applies regardless of whether a homeowner or a licensed contractor does the work.
How long does a typical outdoor lighting installation take in the GTA, from permit to completion?
A straightforward outdoor lighting installation with a new circuit, six to eight fixtures, and a standard underground conduit run, typically takes two to four days of total elapsed time: one day for electrician labour, and one to three days waiting for the ESA inspection booking. ESA inspections in the GTA are typically scheduled within two to five business days in shoulder season and five to ten business days during the summer peak. For a multi-zone installation with longer conduit runs and a smart control system, budget for a two-week project window from permit application to final inspection sign-off.
The Common Thread: Plan First, Pull the Permit, Use the Right Fixtures
Every outdoor lighting tear-out we handle across Toronto, Mississauga, Vaughan, and Brampton traces back to one of three root causes. Someone skipped the ESA permit and utility locates. Someone bought fixtures that couldn't handle an Ontario winter. Someone started digging before they had a layout plan. None of these mistakes are complicated to avoid. All of them are expensive to fix.
The first-time cost of a properly planned and permitted outdoor lighting system in the GTA is $500–$2,500, depending on scope. That price includes the permit, the licensed electrician, and the right fixtures for Canadian winters. It does not include a second installation when the first one fails.
If you're planning outdoor lighting for a Toronto, Mississauga, Vaughan, or Brampton property in 2026, start with the plan before you start with the fixtures. Walk the property after dark. Call Ontario One Call before you trench. Get the ESA permit in place before the electrician pulls wire. Those three steps won't make the project more expensive. They'll make the project worth doing once.
get a quote for outdoor lighting installation in the GTA
ATB Construction installs outdoor lighting systems across Toronto, Mississauga, Vaughan, and Brampton. Contact us for a site assessment and installation quote.
Tags
Related articles
Why Most Outdoor Lighting Goes South After Two Winters and How to Stop It
Get the lowdown on why your outdoor lighting fails after a couple of winters in wet, cold spots. Learn the tricks to prevent frost heave and wood rot so your setup lasts the long haul.
Why Most Porch Builds Fail After Two Winters and How to Stop It
Most porches that fall apart after two winters share the same issues: frost heave and wood rot. Here's what you need to know to build a porch that lasts through Canada's wet, cold seasons.
How to Winterize Outdoor Lighting in Toronto & the GTA
GTA winters destroy poorly installed outdoor lighting inside two seasons. This guide covers frost-proof footings, ESA permit requirements, 2026 pricing, and why LED beats every alternative when temperatures drop below -20°C in Toronto, Mississauga, Vaughan, and Brampton.