Why DIY Repairs End in Full Tear-Outs Across Toronto & the GTA
Most DIY repair attempts in Toronto cost $200–$1,000 upfront. When they fail, the contractor call-back costs $3,000–$15,000. A GTA contractor explains what goes wrong and how to catch it before it gets expensive.
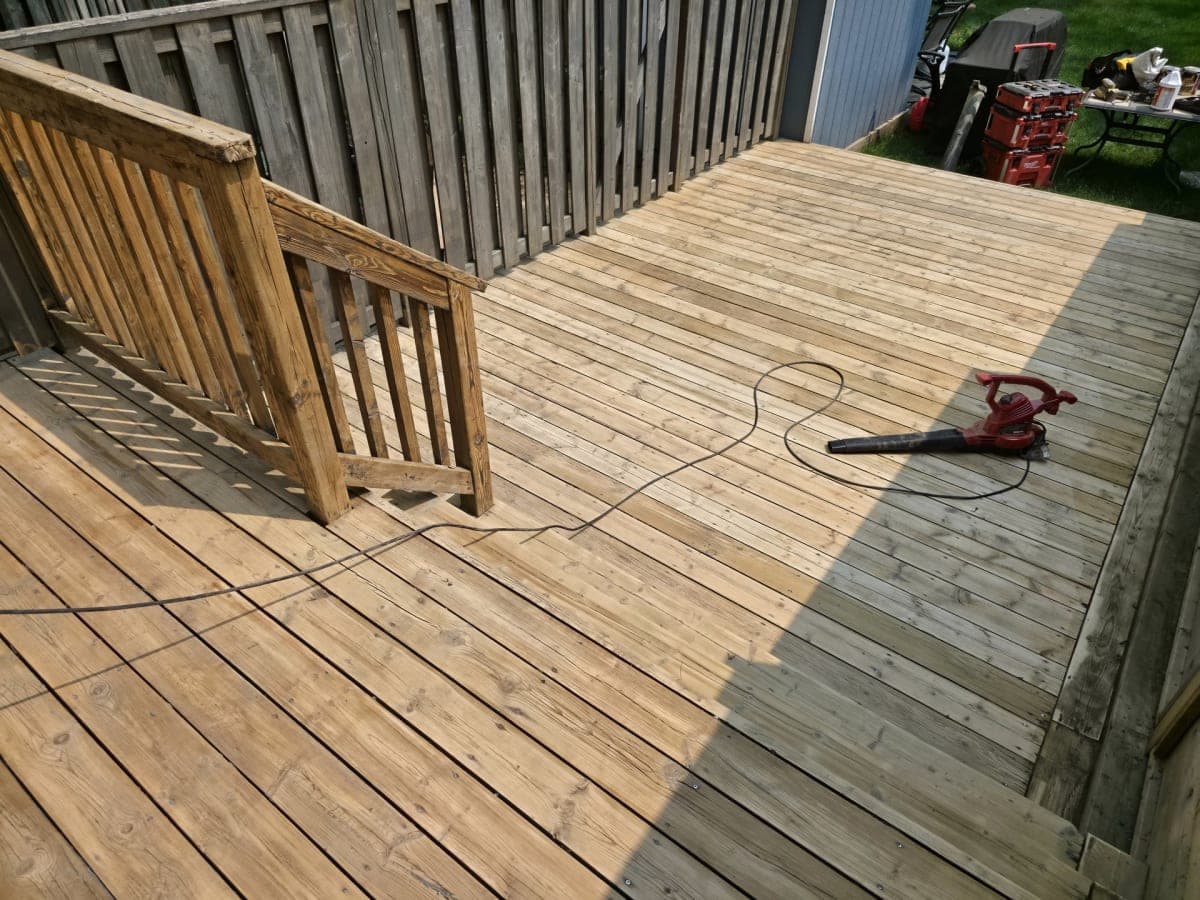
Last spring in Mississauga, we got a call that started with "I just tried to fix my deck and now there's a gap I can't explain." When we arrived, the homeowner had replaced three surface boards over a weekend. The boards looked fine. But the ledger board underneath had been pulling away from the house for two years, and the repair work covered the only visible sign. By the time we were done assessing, the news wasn't good. Full tear-out. New ledger. Reframed joists. The bill landed at $9,400.
This kind of story isn't rare across Toronto, Mississauga, Vaughan, and Brampton. We see versions of it every season. A homeowner spends a weekend and a few hundred dollars on a patch. The patch fails. We get called in. What follows is almost always more expensive than hiring a professional at the start.
deck repair and construction services
Key Takeaways
- DIY patch jobs across the GTA typically cost $200–$1,000, but failed patches lead to tear-outs costing $3,000–$15,000 depending on structure type
- Toronto's freeze-thaw climate averages roughly 30 cycles per year (Environment and Climate Change Canada, 2024), accelerating hidden damage beneath surface repairs
- Tear-outs that expose structural or electrical work in Toronto require permits from the Toronto Building Division or ESA sign-off
- Three failure patterns account for most of the DIY tear-outs we handle across the GTA: surface-only fixes, skipped permits, and wrong materials for Ontario's climate
- Catching the warning signs early, before a surface repair hides them, is the only reliable way to avoid a full rebuild
Why Does Toronto's Climate Turn Small Repairs Into Big Problems?
Ontario's freeze-thaw cycle is genuinely hard on buildings. Toronto and the broader GTA average approximately 30 freeze-thaw cycles per year (Environment and Climate Change Canada, 2024). Each cycle forces water into cracks, expands them as it freezes, then contracts as it thaws. A hairline crack in October becomes a structural gap by March. That pattern is why a DIY patch that looks solid in September can be failing by April.
Most homeowners see the surface. They see a cracked board, a bubbled patch of drywall, a dripping join. They fix what they see. But in Ontario's climate, visible damage is almost always behind the visible damage. The real problem started further back, in a fastener that rusted, a seal that cracked, a footing that heaved.
In our experience working across Toronto, Vaughan, Brampton, and Mississauga, DIY repairs that hide rather than solve the source problem are the leading reason we end up doing complete tear-outs on structures that could have been repaired cheaply twelve months earlier. The patch is rarely the problem. The problem is everything the patch covered up.
What Does a DIY Patch Actually Cost vs. a Full Tear-Out in the GTA?
The cost gap between catching a problem early and calling a contractor after a failed DIY attempt is significant in the Toronto market. A straightforward surface patch job, materials from a big box store plus a weekend of work, typically runs $200–$1,000 depending on scope. A professional repair done correctly, when the problem is still isolated, runs $800–$3,500 in the GTA depending on structure type and access. But a full tear-out and rebuild, the outcome we see when a DIY fix delays or hides the real damage, runs $3,000–$15,000 in the Toronto market as of 2026.
That's not a small gap. It's the difference between a manageable maintenance cost and a project that disrupts a family's summer.
| Repair Approach | Typical GTA Cost (2026 CAD) | Timeline | Warranty | Risk Level |
|---|---|---|---|---|
| DIY patch (materials only) | $200–$1,000 | 1–2 days | None | High — hides root cause |
| Professional targeted repair | $800–$3,500 | 1–3 days | 1–2 years typical | Low — root cause addressed |
| Full tear-out and rebuild | $3,000–$15,000 | 1–3 weeks | 5–10 years typical | Low — starts fresh |
| DIY attempt then tear-out | $3,200–$16,000 combined | Weeks + delay | None on original patch | Very high |
The last row is what we actually invoice in a lot of GTA homes. The homeowner paid twice: once for the patch, then again for the proper rebuild.
[CITATION CAPSULE] DIY repair materials for common Toronto home repairs (decks, drywall, minor structural patches) typically cost $200–$1,000 in the GTA. When these repairs fail and require professional remediation, the total project cost including the failed DIY work and full rebuild ranges from $3,000 to $15,000 depending on the structure type, access conditions, and municipality. These figures are based on active project invoices across Toronto, Mississauga, Vaughan, and Brampton (ATB Construction project data, 2026).
Based on our project records from 2023 through early 2026, approximately 60% of full tear-out jobs we complete in the GTA were preceded by a homeowner repair attempt. In Brampton and Mississauga specifically, deck tear-outs triggered by failed DIY ledger or joist repairs averaged $8,200 in total project cost, compared to $3,100 for the same scope when we were called before any DIY work was done.
The Three DIY Mistakes That Almost Always Lead to a Tear-Out in Toronto
Mistake 1: Fixing the Surface and Missing the Source
This is the most common pattern. A homeowner sees damaged boards on a deck in Vaughan, or a wet patch on a ceiling in a Brampton semi, and they address what they can see. The boards get replaced. The drywall gets patched. The visible evidence disappears. But the water entry point, the rotted framing, the failing fastener, none of that was touched. It's still there. It's now hidden.
We worked a job in Etobicoke last fall where a homeowner had replaced deck boards twice in three years, spending roughly $600 each time. When we opened up the framing, the original ledger had been pulling away from the house since the first replacement. The new boards were screwed into joists that were no longer properly supported. The whole deck needed to come off. That job ran $7,800.
The rule we tell every homeowner: if you're seeing damage, ask yourself what allowed the damage to happen. That answer is almost never the thing you can see.
Mistake 2: Skipping the Permit Because the Job "Doesn't Need One"
Toronto homeowners often assume permits apply to new builds, not repairs. That's not accurate. The City of Toronto Building Division requires a permit for structural repairs that affect the building envelope, including load-bearing elements, exterior cladding tied to the structure, and any work that exposes or alters electrical or mechanical systems (City of Toronto Building Division, 2025).
In Mississauga and Brampton, similar rules apply under the Ontario Building Code. Electrical work of any kind, including anything that is exposed during a tear-out, requires ESA (Electrical Safety Authority) sign-off before it's closed up again (Electrical Safety Authority Ontario, 2025).
What does this mean for a DIY repair? If your patch job opens up a wall and you see old wiring, you cannot close that wall without an electrical inspection. If your deck repair reveals that the ledger is anchored into the rim joist with non-compliant hardware, a permit may be triggered. The homeowner who skips this step and sells the property three years later is looking at a forced disclosure problem or a required remediation at the worst possible time.
[CITATION CAPSULE] The City of Toronto Building Division requires building permits for structural repairs affecting load-bearing elements, the building envelope, or systems exposed during renovation (City of Toronto Building Division, 2025). Electrical work uncovered during any repair in Ontario requires ESA inspection before the work is closed (Electrical Safety Authority Ontario, 2025). Unpermitted structural work can result in fines or forced removal under the Ontario Building Code Act, RSO 1990.
Mistake 3: Using Materials That Can't Handle Ontario's Climate
We see this consistently in the materials homeowners bring to the job. Deck screws that aren't rated for ACQ-treated lumber. Caulking products designed for interior use applied to exterior joints. Standard drywall compound used on a wall section that gets humid in summer. These materials look right in the store and fail within one or two seasons in Ontario's climate.
The GTA sits in a climate zone where materials need to handle temperature swings from -25°C in January to +35°C in July (Environment and Climate Change Canada, 2024). That's a 60-degree swing. Fasteners that aren't hot-dip galvanized or stainless will rust through in two to three seasons of freeze-thaw exposure. Sealants that aren't rated for that range will crack and pull. When those materials fail, the repair fails, and the water entry that was supposedly fixed starts again.
We've pulled apart deck repairs in Brampton and found regular zinc-plated deck screws oxidized to the point of structural failure inside pressure-treated lumber. That repair was eighteen months old. The homeowner had no idea.
When Does a Tear-Out Require a Permit in Toronto?
This is the question we get most often from homeowners who've already started work and are now worried. The short answer is: more often than you'd expect.
Structural Work Exposed During Tear-Out
Any tear-out that exposes or modifies load-bearing structure, rim joists, beams, columns, or foundation elements, requires a permit from the Toronto Building Division before work can proceed or be closed up. This is true whether you're tearing out a deck, a wall section, or a portion of a floor system. The same applies in Mississauga, Vaughan, and Brampton under the Ontario Building Code.
Permit fees for structural repair work in Toronto typically run $200–$600 for residential projects depending on the declared value of work (City of Toronto Building Division Schedule of Fees, 2025). That's not an enormous cost relative to the project. Skipping it and being flagged during a sale inspection can cost ten times that to remediate under pressure.
Electrical Work Uncovered During Tear-Out
In Ontario, any electrical work, whether you planned for it or not, that becomes accessible during renovation or repair must be inspected by an ESA-certified inspector before it's closed again. This isn't optional. It applies to wiring in a basement ceiling you've opened for a leak repair, or a junction box exposed during a deck ledger tear-out (Electrical Safety Authority Ontario, 2025).
The practical advice: if you're opening up any wall, ceiling, or structural assembly in Toronto or across the GTA, call the Building Division first. A five-minute conversation will tell you whether a permit is needed. It's always faster to ask before you open the wall than to figure it out after.
How to Know Whether Your Repair Is a Patch or a Tear-Out
The question homeowners should actually ask isn't "can I fix this myself?" It's "do I know what caused this?" If you can't answer that second question, you're not ready to start. Every DIY failure we inherit in the GTA has one thing in common: the homeowner fixed the effect without diagnosing the cause.
Here's a practical checklist to run before any repair work:
- Can you see the full extent of the damage? If you can only see the surface, the full extent is probably larger.
- Do you know what caused it? Water entry, frost heave, fastener failure, settlement: each has a different fix.
- Is the damage moving? A crack that's grown since last season is an active problem. Active problems don't get patched.
- Does any part of the repair touch structure, electrical, or mechanical systems? If yes, call the Building Division before you open anything.
- Is the affected area load-bearing? If you're not sure, treat it as if it is until you know otherwise.
If any of those questions produces a "no" or "I don't know," that's the moment to call a contractor for an assessment before doing any work. Assessment visits are not expensive. Full tear-outs are.
What to Do Instead of a DIY Patch in Toronto or the GTA
We're not telling homeowners to never touch their own homes. Plenty of maintenance tasks, painting, caulking weathered trim, replacing individual hardware items, are genuinely within reach for a prepared homeowner. The problem is misidentifying a structural or moisture problem as a surface one.
The smarter sequence for most GTA homeowners:
Step 1: Document the damage with photos before touching anything. Date the photos. This matters for insurance and for understanding whether the problem is progressing.
Step 2: Look for the source, not just the symptom. A stain on a ceiling means water came from somewhere. Find where before you fix the stain.
Step 3: If the source involves structure, water penetration into framing, electrical, or anything you can't see the full extent of, get a professional assessment. Most GTA contractors, including us, offer site assessments that are priced separately from the repair.
Step 4: If you get a green light to proceed with a DIY fix, use the right materials. For exterior work in Ontario, that means ACQ-compatible fasteners, exterior-rated sealants with flexibility ratings for the climate zone, and pressure-treated lumber where any wood contacts concrete or grade.
Step 5: Monitor the repair. If it was the right fix, it will hold through two or three freeze-thaw seasons without change. If it moves, settles, or shows new staining, the source wasn't fully addressed.
Frequently Asked Questions
How much does a full deck tear-out and rebuild cost in Toronto in 2026?
A full deck tear-out and rebuild in Toronto typically runs $6,000–$15,000 depending on the deck size, height, materials, and whether the framing requires remediation before rebuilding. In Mississauga and Vaughan, similar scopes land in the $5,500–$13,000 range. These figures assume standard residential decks under 400 square feet. Larger or elevated decks, or those requiring structural engineering sign-off, will exceed these ranges.
Do I need a permit to tear out a deck in Toronto?
Yes, in most cases. The City of Toronto Building Division requires a permit if the deck is attached to the house, exceeds 10 m² in area, or if the tear-out exposes structural elements that need repair or modification (City of Toronto Building Division, 2025). In Brampton and Mississauga, similar rules apply under the Ontario Building Code. Calling the building department before starting work takes five minutes and prevents a lot of expensive problems later.
What happens if electrical wiring is exposed during a DIY repair in Ontario?
Any electrical work exposed during renovation or repair in Ontario must be inspected by the Electrical Safety Authority (ESA) before it's closed back up. This applies whether you planned to touch the wiring or not. Closing a wall over uninspected wiring is a code violation and a safety risk. You can contact the ESA directly to arrange an inspection, or your contractor can manage this as part of the overall project scope (Electrical Safety Authority Ontario, 2025).
How do I know if my DIY repair is safe or if I need a professional?
The clearest sign you need a professional is not being able to identify the source of the damage. A crack or stain that you can see but can't explain is an active problem. In Ontario's freeze-thaw climate, active problems don't stay small. If the damage is near structure, moisture-sensitive systems, or anything that connects to the house envelope, get an assessment before starting. The cost of an assessment is a small fraction of the cost of tearing out a failed repair.
Can a failed DIY repair affect my home insurance in Ontario?
Yes, it can. Ontario home insurance policies typically require homeowners to maintain the property in good repair. A DIY repair that fails and causes subsequent damage, for example a patch job that hides ongoing water entry leading to mould, can be a basis for an insurer to reduce or deny a claim for the consequential damage. Documenting what you repaired, when, and with what materials matters if a claim ever comes up. This is another reason to get an assessment when you're unsure about the scope of a problem.
The Bottom Line for GTA Homeowners
Toronto's climate doesn't forgive incomplete repairs. Thirty freeze-thaw cycles a year will find every hairline crack, every improperly rated fastener, every moisture path you thought you sealed. A patch that hides an active problem isn't a repair. It's a delay, and in the GTA, delays are expensive.
The homeowners who avoid the full tear-out scenario share a consistent habit: they diagnose before they fix. They ask what caused the damage, not just how to make it look better. They call the building department before they open anything structural. They use materials rated for Ontario conditions.
That approach doesn't require a contractor for every job. It does require knowing when a job has moved past what you can reliably do yourself. If you're looking at something in Toronto, Mississauga, Vaughan, or Brampton and you're not sure whether it's a surface fix or a bigger problem, the most cost-effective thing you can do is find out before you start. A site assessment now is almost always cheaper than a tear-out later.
Tags
Related articles
Why Most Outdoor Lighting Goes South After Two Winters and How to Stop It
Get the lowdown on why your outdoor lighting fails after a couple of winters in wet, cold spots. Learn the tricks to prevent frost heave and wood rot so your setup lasts the long haul.
Why Most Porch Builds Fail After Two Winters and How to Stop It
Most porches that fall apart after two winters share the same issues: frost heave and wood rot. Here's what you need to know to build a porch that lasts through Canada's wet, cold seasons.
How to Winterize Outdoor Lighting in Toronto & the GTA
GTA winters destroy poorly installed outdoor lighting inside two seasons. This guide covers frost-proof footings, ESA permit requirements, 2026 pricing, and why LED beats every alternative when temperatures drop below -20°C in Toronto, Mississauga, Vaughan, and Brampton.