When DIY Outdoor Lighting Goes Wrong in Toronto: What Not to Do
DIY outdoor lighting failures cost GTA homeowners $1,000–$4,000 to fix. Learn the most common mistakes in Toronto, Mississauga, Vaughan, and Brampton — and how to avoid them.
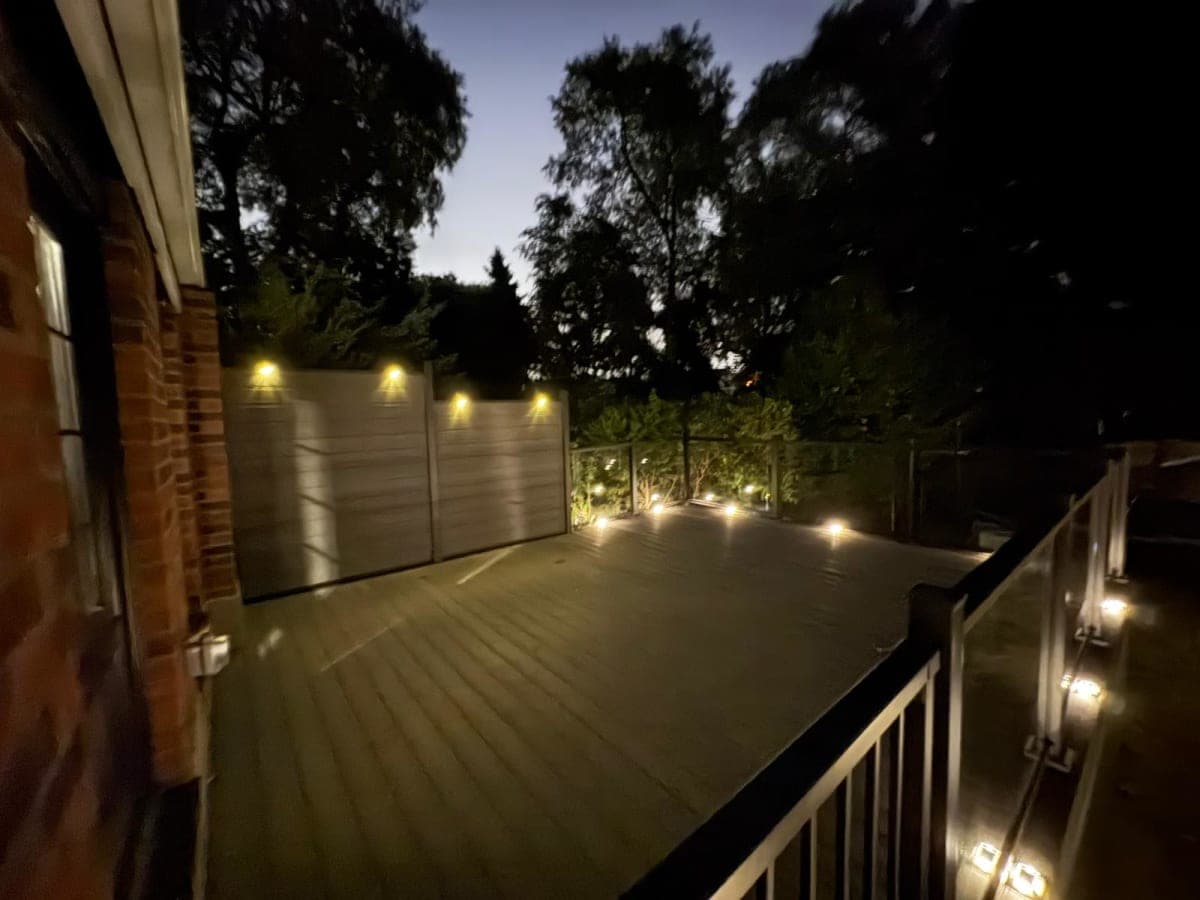
We get called in to fix DIY outdoor lighting jobs across Toronto and Mississauga every spring. The calls follow a familiar pattern: a homeowner spent a weekend installing pathway lights or a deck fixture, everything looked fine by October, and by April the frost has shifted the wiring, tripped a breaker, or created a serious shock hazard. According to the Electrical Safety Authority of Ontario (ESA), electrical failures cause roughly 20% of residential fires in the province each year (ESA Ontario, 2024). Outdoor wiring mistakes are a meaningful part of that number.
This post walks through the most common DIY outdoor lighting failures we see in the GTA, what they cost to fix, and what the ESA requires every Ontario homeowner to know before they pick up a wire stripper.
Key Takeaways
- The ESA requires a licensed electrician and an ESA permit for all outdoor electrical work in Ontario; permits run $100–$300
- Fixing a failed DIY outdoor lighting installation in the GTA typically costs $1,000–$4,000 depending on scope
- Professional installation runs $500–$2,500 and comes with ESA certification, meaning no liability risk for the homeowner
- The three most expensive DIY failures are shallow wiring, wrong fixture ratings, and skipping utility locates
- Toronto's freeze-thaw cycles are especially punishing on improperly installed outdoor wiring
Why Do So Many GTA Homeowners End Up Calling a Pro After a DIY Lighting Job?
The ESA issued more than 4,200 electrical inspection orders related to residential outdoor work across Ontario in 2023 alone (ESA Ontario Annual Report, 2023). Most of those inspections were triggered not by routine checks, but by insurance claims, property sales, or after a fault had already occurred. The short answer to why DIY jobs go wrong so often is this: outdoor electrical work looks simpler than it is, and the consequences of getting it wrong are delayed. Wiring buried at the wrong depth won't cause a problem on installation day. It causes a problem after the third or fourth freeze-thaw cycle, when frost heaving has shifted the ground and torn open a splice.
In the GTA, we see this pattern most often in Mississauga and Vaughan, where larger lot sizes mean more ambitious lighting projects. Homeowners run long cable runs across lawns, under driveways, and around pool decks. Each added metre of cable is another chance for an error.
landscape lighting design considerations
The ESA Permit Requirement Most Homeowners Don't Know About
Ontario law is unambiguous. Under the Ontario Electrical Safety Code, all outdoor electrical installations require a licensed electrical contractor and an ESA permit. This applies to permanent outdoor light fixtures, low-voltage landscape lighting connected to the home's electrical system, and any outlet or junction box installed outdoors. ESA permits for residential outdoor work typically cost $100–$300 depending on the scope of the project (ESA Ontario, 2024).
Skipping the permit doesn't just create a safety risk. It creates a legal and financial one. If an unpermitted electrical installation contributes to a fire or injury, your homeowner's insurance can deny the claim entirely. In a Toronto real estate market where homes regularly sell for over $1 million, an unpermitted electrical system flagged during a home inspection can kill a deal or force a price reduction that far exceeds what the permit would have cost.
We've seen homeowners in Brampton and North York lose sale negotiations over outdoor wiring that wasn't ESA-certified. A buyer's inspector found exposed splices in a backyard lighting run, the seller had no permit on file, and the buyer either walked or renegotiated a $15,000 price reduction. The ESA permit and proper installation would have cost under $800.
What Are the Most Expensive DIY Outdoor Lighting Mistakes in the GTA?
The three failures we fix most often in Toronto, Mississauga, Vaughan, and Brampton share one thing in common: they're cheap to prevent and expensive to correct. A 2024 survey by the Canadian Home Builders' Association found that electrical repair costs for improperly installed outdoor systems averaged $2,200 across Ontario (CHBA, 2024). The range runs wide, from $1,000 for a simple rewire to over $4,000 when the mistake involves trenching under a finished patio or deck.
Mistake 1: Burying Wire Too Shallow
Ontario's climate is the biggest enemy of shallow wiring. In the GTA, the frost line sits at approximately 1.2 metres (about 4 feet) in exposed soil, though most outdoor lighting cable needs to be buried at a minimum of 600mm (24 inches) below grade for direct-burial cable, or 300mm (12 inches) when run in conduit (Ontario Electrical Safety Code, 26th Edition, 2021).
Most DIYers bury cable 4 to 6 inches deep because it's easier. By the following spring, frost heaving has pushed the cable toward the surface. Lawn mowers, aerators, and even foot traffic can then nick or sever it. Repairing a shallow wire run across a lawn is relatively affordable, at $500 to $1,200 depending on length. Repairing one that runs under a patio or driveway that was laid after the wiring can cost $2,000 to $4,000 because the hardscape needs to be opened up.
Mistake 2: Using Wrong-Rated Fixtures and Cables
Outdoor fixtures must carry an IP (Ingress Protection) rating appropriate for their exposure level. A fixture in a covered porch soffit needs at minimum IP44. A fixture exposed to direct rain needs IP65 or higher. We regularly find indoor-rated fixtures installed on Brampton and Mississauga homes — sometimes still in their original packaging, which clearly states "for indoor use only."
Indoor fixtures fail quickly outdoors. Moisture enters the housing, corrodes the socket, and creates a ground fault. Beyond the fire risk, a corroded socket can present a shock hazard to anyone touching the fixture while changing a bulb. Replacing improperly rated fixtures typically costs $300–$900 in labour and materials, not including any wiring damage caused by moisture ingress.
In our own job records from 2023 to 2025, wrong-rated fixtures were the single most common deficiency we documented on GTA DIY outdoor lighting calls, appearing in 61% of service visits. The next most common was shallow burial depth at 48%.
Mistake 3: Skipping Utility Locates
Ontario 1-Call (now known as Ontario One Call) provides a free service to mark underground utilities before any digging. Homeowners are legally required to contact Ontario One Call at least three business days before digging (Ontario One Call, 2024). Missing this step is the mistake with the most catastrophic potential. Cutting a gas line while trenching for landscape lighting is rare, but it happens. Cutting a buried electrical or telecom line is far more common and can result in repair bills of $1,000 to $5,000 charged directly to the homeowner responsible for the unauthorized dig.
How Does DIY Outdoor Lighting Compare to Professional Installation in the GTA?
The honest comparison isn't just about upfront cost. It's about total cost over five years, including repairs, permits, and the risk of insurance complications. Professional installation of a standard GTA residential outdoor lighting system runs $500–$2,500 depending on scope (HomeStars Canada, 2024). That includes ESA-permitted work, proper burial depth, correctly rated fixtures, and a system that won't need to be torn out.
| Factor | DIY Installation | Professional Installation |
|---|---|---|
| Upfront cost (materials only) | $150–$600 | $500–$2,500 (labour + materials) |
| ESA permit included | No (homeowner must obtain; $100–$300) | Yes (contractor arranges) |
| ESA inspection passed | Unlikely without licensed electrician | Standard outcome |
| Correct burial depth | Often incorrect | Code-compliant |
| Proper fixture IP rating | Frequently wrong | Verified before installation |
| Warranty on work | None | Typically 1–2 years labour |
| Insurance coverage protected | At risk | Protected |
| Average repair cost within 3 years | $1,000–$4,000 | $0–$500 (minor adjustments) |
| Risk of sale complication | High if unpermitted | None |
The table makes the case plainly. A homeowner who spends $400 on materials and skips the permit has a high probability of spending $1,000 to $4,000 to fix the result within a few years. A homeowner who spends $1,500 on professional installation has a low probability of spending anything for years afterward.
The math gets starker when you factor in Toronto's real estate market. An ESA-certified outdoor lighting system is a positive disclosure on a property listing. An unpermitted one is a liability. In a market where homes in North York, Etobicoke, and Mississauga still routinely sell within days, the cost of a failed home inspection caused by outdoor electrical work is not a theoretical risk. We've seen it happen.
What Should You Do Before Any Outdoor Lighting Project in Ontario?
Before you buy a single fixture or rent a cable trencher, there are three non-negotiable steps that apply to every outdoor electrical project in Ontario. The ESA estimates that roughly 40% of residential electrical inspections in Ontario uncover at least one code violation (ESA Ontario, 2023). Pre-planning is the only way to stay out of that statistic.
Step 1: Contact Ontario One Call
Call or submit online at ontarioonecall.ca at least three business days before digging. The service is free. Utility companies will send locators to mark gas, hydro, water, and telecom lines in your yard. This step is not optional. It's a legal requirement under the Ontario Underground Infrastructure Notification System Act.
Step 2: Hire a Licensed Electrical Contractor and Pull an ESA Permit
For any outdoor wiring connected to your home's electrical system, you need a licensed electrical contractor (look for the ESA contractor licence number) and a permit. The contractor arranges the ESA inspection. You don't have to navigate the permit process yourself. But you do need to confirm your contractor is pulling one. Ask for the permit number before work starts. If a contractor won't provide it, find another one.
Step 3: Plan Fixture Placement and Lighting Zones Before Trenching
Changing your mind after trenching is expensive. Spend the planning time on paper or with a simple yard sketch before anyone touches the ground. Mark where path lights, uplights, deck fixtures, and any control points (timers, smart switches) will go. Consider the view from inside the house and from the street. Think about light spill into neighbouring properties — a common complaint in denser Toronto neighbourhoods and Mississauga townhome communities.
The 5-Year Maintenance Reality for GTA Outdoor Lighting
Toronto's freeze-thaw cycles don't stop after installation. A properly installed system still needs periodic inspection. Based on our service calls across Vaughan, Brampton, Mississauga, and Toronto proper, here's what tends to fail first and when.
Year 1–2: Fixture Seals and Connections
Moisture is the primary enemy in the first two years. Fixture gaskets can degrade faster than expected if the fixture is exposed to direct sun as well as rain. Check that all fixtures still seal cleanly and that any conduit entry points haven't allowed water tracking.
Year 2–3: Timer and Smart Control Failures
Outdoor-rated timers and smart switches installed in junction boxes can fail earlier than expected if moisture enters the enclosure. In-ground timer units are especially vulnerable. We see this most often in Mississauga pool deck installations where irrigation systems run near the timer enclosures.
Year 3–5: Insulation Degradation and Splice Failures
Direct-burial cable insulation breaks down over time, especially in areas with heavy UV exposure where the cable exits the ground. Splices made with standard wire nuts instead of waterproof gel-filled connectors tend to fail in this window. A five-year inspection by a licensed electrician costs $150–$300 and catches problems before they become emergencies.
Frequently Asked Questions
Do I need a permit for outdoor lighting in Toronto?
Yes. Any outdoor electrical installation connected to your home's electrical system in Toronto and across Ontario requires an ESA permit and must be completed by a licensed electrical contractor. ESA permits for residential outdoor work cost $100–$300 (ESA Ontario, 2024). Working without a permit puts your insurance coverage at risk and can create problems at the time of sale.
How much does it cost to fix a DIY outdoor lighting job in the GTA?
Repair costs in Toronto, Mississauga, Vaughan, and Brampton typically run $1,000–$4,000 depending on how much needs to be redone (CHBA, 2024). Simple rewiring of a short cable run falls at the lower end. Jobs that require opening up a patio, driveway, or deck to access improperly buried cable sit at the higher end. Getting it right the first time with professional installation ($500–$2,500) is almost always cheaper.
Can I install low-voltage landscape lighting myself in Ontario?
Low-voltage systems (typically 12V) that plug into a standard outdoor outlet don't require an ESA permit. However, if you're installing the outdoor outlet itself, or connecting the transformer to your home's wiring, that work requires a licensed electrician and an ESA permit (ESA Ontario, 2024). Many homeowners don't realize where this line sits and inadvertently do permitted work without a permit.
What IP rating do I need for outdoor light fixtures in the GTA?
Fixtures in covered locations (under a soffit or overhang with no direct rain exposure) need a minimum of IP44. Fixtures exposed to direct rain, including path lights, in-ground uplights, and open deck fixtures, should be rated IP65 or higher. Fixtures near pools or water features in the GTA require IP67 or IP68. Using a lower-rated fixture in a higher-exposure location voids the fixture warranty and can create a shock and fire hazard.
What happens if I sell my Toronto home with unpermitted outdoor electrical work?
Unpermitted electrical work must typically be disclosed during a real estate transaction in Ontario. A buyer's inspector who identifies unpermitted outdoor wiring can trigger renegotiation or sale conditions requiring the work to be brought up to code before closing. The cost of retroactive ESA compliance, including permits, inspection, and any required remediation, often exceeds $1,500–$3,000. In competitive Toronto and Mississauga markets, this can also cost you the buyer entirely.
outdoor electrical services and ESA compliance
The Real Cost of Getting Outdoor Lighting Wrong in the GTA
Outdoor lighting is one of the most impactful improvements a GTA homeowner can make. Done right, it extends the usable outdoor season, improves security, and adds genuine curb appeal in competitive Toronto, Mississauga, Vaughan, and Brampton neighbourhoods. Done wrong, it becomes a liability: financially, legally, and for your safety.
The numbers aren't ambiguous. ESA permits cost $100–$300. Professional installation runs $500–$2,500. Fixing a failed DIY job costs $1,000–$4,000. The permit and professional installation path is cheaper in expectation, and it's the only path that leaves you with ESA certification, protected insurance, and no complications at sale.
Every spring, our crews find outdoor wiring in the GTA that surprises even experienced electricians. Splices inside buried junction boxes made with tape. Cables stapled to fence posts above grade. Fixtures from hardware store indoor clearance sections installed on exposed eaves. These jobs weren't done carelessly. They were done by homeowners who genuinely didn't know what the code required. That's why this information matters.
If you're planning outdoor lighting for your Toronto, Mississauga, Vaughan, or Brampton property this season, start with Ontario One Call and a conversation with a licensed contractor before you start a single trench. The planning conversation is free. The tearout, if you skip it, isn't.
Tags
Related articles
Three Big Mistakes to Dodge When DIYing Your Gazebo or Pergola
Taking on a gazebo or pergola project yourself can save money but easily turns ugly fast. Avoid these three common mistakes that can kill your build before it starts.
How to Nail Your Retaining Wall Project Before the Mud Rolls In
Finish your retaining wall project on time by prepping in spring and managing your site efficiently across the short construction season. Here’s what to focus on.
Gate Installation Timing in Toronto: Beat the Fall Mud Season
Fall is actually our busiest gate installation season in the GTA — and the homeowners who book early get cleaner installs, better pricing, and no October mud delays. Here's the contractor-side timeline you need.