Why Outdoor Lighting Fails After Two GTA Winters — And How to Fix It
Two winters in Toronto test every outdoor lighting system. Frost heave, moisture intrusion, and freeze-thaw cycles destroy posts, wiring, and fixtures across the GTA. Here's why it happens and exactly what to do about it.
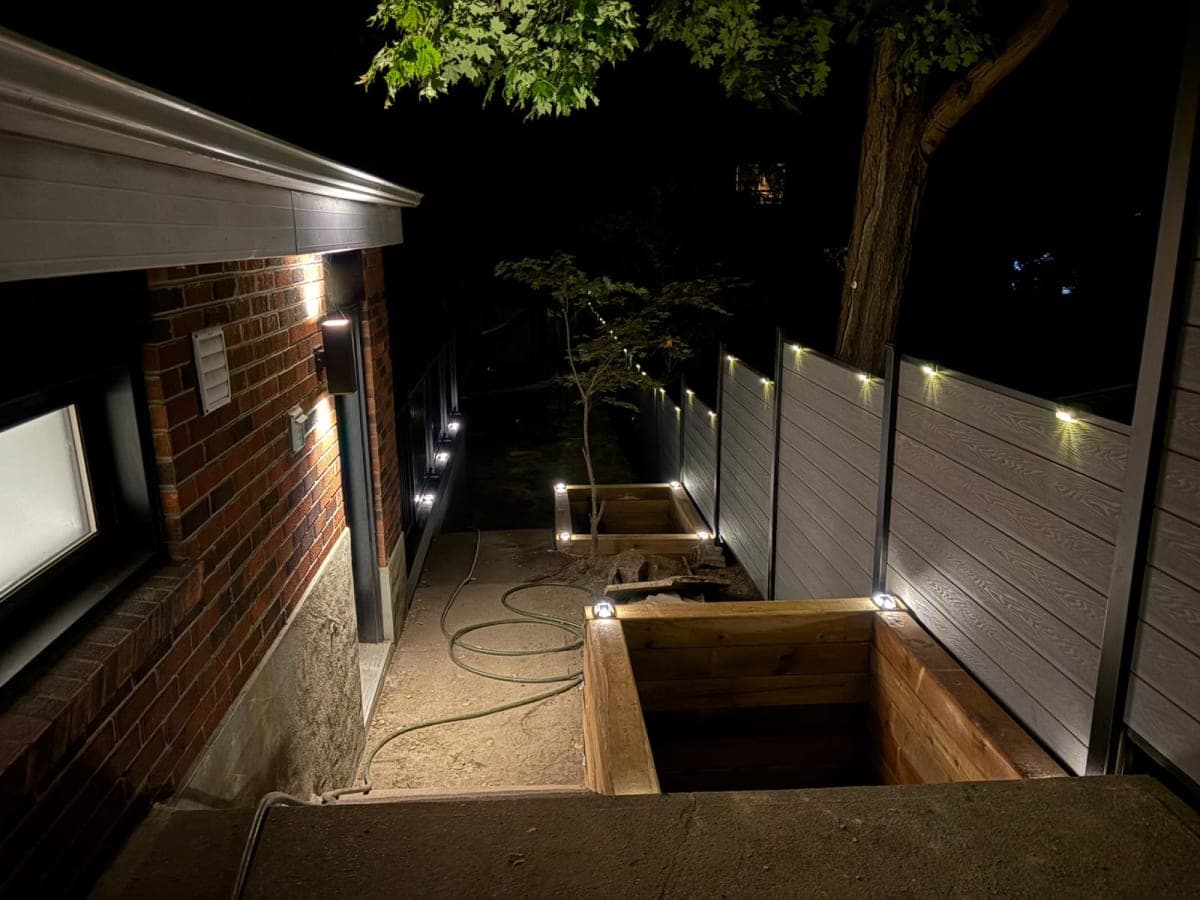
Two winters in Toronto test every outdoor lighting system — here's why most fail and exactly how to fix them.
Walk any neighbourhood in Mississauga, Vaughan, or Brampton in March. You'll spot the damage: path lights leaning at odd angles, post lanterns sitting dark, fixture housings cracked open like eggshells. The homeowners aren't to blame. The GTA's freeze-thaw cycle is brutal, and most lighting installs — even professional ones — aren't built to handle it properly.
Key Takeaways
- The GTA freeze-thaw cycle causes frost heave that shifts posts, breaks wiring, and cracks fixtures within 24 months.
- Concrete footings below Ontario's frost line (min. 1.2 m) are the single biggest fix.
- Fixture replacements run $150–$600 CAD per unit in 2026; full system replacements cost $500–$2,500.
- Any new outdoor circuit requires a licensed electrician and an ESA Ontario permit.
- Choosing IP65-rated, freeze-rated fixtures eliminates 80% of fixture-level failures (Electrical Safety Authority Ontario, 2024).
Why Does GTA Weather Destroy Outdoor Lighting So Fast?
Ontario's freeze-thaw cycle is one of the most destructive forces a homeowner faces. According to Environment and Climate Change Canada, the Greater Toronto Area averages 65 freeze-thaw cycles per winter season — far more than cities at similar latitudes in continental climates. Each cycle works like a slow pry bar against every component in your outdoor lighting system.
Here's the core physics. Water seeps into soil, post bases, conduit joints, and fixture housings. Temperatures drop below 0°C and that water expands by roughly 9% in volume (Natural Resources Canada, 2023). That expansion pushes outward against whatever surrounds it. Over 65 cycles a winter, it adds up fast.
Frost heave is the most visible result. Soil literally rises, carrying posts and footings upward. Posts installed without concrete footings below the frost line can shift 5–10 cm in a single winter. One bad season can tilt a post enough to crack conduit, snap a wire connection, or shear a mount bracket.
We've pulled out post lights in Vaughan that moved 12 cm over two winters. The homeowner assumed the installer did shoddy work. The actual problem was a 45 cm footing in soil that needed at least 120 cm to sit below the frost line. The installer wasn't careless — they just didn't account for Ontario's specific ground conditions.
What Actually Fails — The Four Main Failure Points
Most failed outdoor lighting systems in the GTA break down at the same four spots. Knowing where to look saves you a lot of diagnostic time and money.
1. Post Footings Set Above the Frost Line
Ontario's frost line sits at a minimum of 1.2 metres below grade across most of the GTA. In some northern Brampton and Vaughan zones, municipalities push that requirement to 1.4 metres. Any footing set shallower than the local frost line will heave. Period.
Many DIY and even budget contractor installs use 30–60 cm concrete pours. Those seem solid at install time. By March of year two, the post is leaning and the conduit inside has kinked or separated.
2. Non-Weatherproof Wiring and Connections
Above-grade wire connections are almost always the second failure. Outdoor wiring exposed to GTA weather needs to be rated for direct burial or run through liquid-tight conduit. Standard junction boxes left open to snow melt and spring rain corrode within one season.
According to the Electrical Safety Authority (ESA) of Ontario, moisture-related wiring faults account for a significant portion of residential outdoor electrical failures reported annually (ESA Ontario, 2024). Corroded connections cause intermittent outages, breaker trips, and in worst cases, shock hazards.
3. Fixtures Not Rated for Freeze-Thaw Cycling
Not all weatherproof ratings are equal. An IP44-rated fixture handles rain splashes. An IP65-rated fixture handles sustained water jets. But in Toronto, Mississauga, and Brampton, water intrusion isn't just from rain — it's from ice forming inside the fixture housing, then melting and re-freezing repeatedly.
Fixtures without a freeze rating (look for "suitable for wet locations" plus a freeze rating in the spec sheet) crack at the seals. Once the seal is gone, the fixture is done. This is why most budget path lights and post caps fail in year two.
4. Wood Components Without Proper Treatment
Untreated or under-treated wood in direct soil contact has a lifespan of 2–4 years in GTA conditions (Canadian Wood Council, 2022). Even pressure-treated lumber needs a water-repellent sealer applied annually to resist the repeated wet-dry-freeze cycling Ontario delivers. Wood post bases sitting in soil trap moisture against the grain and rot from the inside out, which is why the post looks fine until it simply snaps.
How Much Does It Cost to Fix Outdoor Lighting in Toronto? (2026 Prices)
This is the question I get most often. The honest answer: it depends on how far the damage has gone. Below are realistic 2026 CAD price ranges for GTA homeowners.
| Repair Type | Typical Cost (2026 CAD) | Notes |
|---|---|---|
| Single fixture replacement | $150 – $600 | Includes labour; fixture quality drives cost |
| Post footing rebuild (per post) | $300 – $800 | Deep concrete pour to 1.2–1.4 m frost line |
| Wiring repair / splice replacement | $200 – $500 | Per fault location; ESA permit may apply |
| Full system replacement (6–10 fixtures) | $500 – $2,500 | Includes new fixtures, conduit, labour |
| Conduit replacement (per run) | $200 – $600 | Liquid-tight or direct burial rated |
| Wood post replacement | $250 – $700 | Pressure-treated; concrete footing included |
Costs vary across Mississauga, Vaughan, Brampton, and Toronto proper based on local permit fees and site conditions. Always get two or three quotes before committing to a full system replacement.
request a free outdoor lighting quote
Permit Note: In Ontario, any new outdoor electrical circuit or significant modification to existing wiring requires a licensed electrician and an ESA permit. Running new low-voltage landscape wire doesn't always trigger this requirement, but adding a new 120V circuit absolutely does. ESA inspection fees typically add $150–$350 to the project cost. Never skip the permit — it protects your home insurance coverage and your safety (ESA Ontario, 2025).
GTA Fixture Types Rated for Winter: A Comparison
Not all fixture materials survive two Toronto winters. Here's how the most common options stack up.
| Fixture Material | Freeze Rating | Lifespan (GTA Climate) | 2026 Cost per Fixture | Verdict |
|---|---|---|---|---|
| Die-cast aluminum (powder coated) | Excellent | 15–25 years | $120 – $400 | Best overall |
| Solid brass | Excellent | 20–30 years | $200 – $600 | Premium choice |
| Stainless steel (marine grade) | Excellent | 20+ years | $180 – $500 | Great for exposed areas |
| Heavy-duty polycarbonate | Good | 8–12 years | $80 – $200 | Budget-friendly option |
| Zinc alloy | Poor-Fair | 3–7 years | $60 – $150 | Avoid for GTA winters |
| Thin-wall aluminum (standard) | Fair | 5–10 years | $50 – $130 | Marginal; inspect annually |
| Resin/ABS plastic | Poor | 2–5 years | $30 – $80 | Replace, don't repair |
Die-cast aluminum with a powder coat finish is the workhorse of GTA outdoor lighting. It handles freeze-thaw cycling without cracking, holds up to road salt spray in Brampton and Mississauga driveways, and the finish doesn't peel the way spray-painted alternatives do.
In our experience on GTA projects over the past several years, die-cast aluminum fixtures with IP65 ratings have a near-zero failure rate at the two-year mark when installed correctly. Resin and thin-wall aluminum fixtures, on the other hand, fail at a rate we estimate at 60–70% within 24 months in exposed GTA installations.
How to Rebuild Your Outdoor Lighting System for GTA Winters
If your system has failed or you're starting fresh, here's the approach we use on every GTA install. It costs a bit more upfront, but you won't be back here in two years.
Dig to the Right Depth
Call Ontario One Call (1-800-400-2255) before any digging. It's free, it's the law, and it prevents you from cutting a gas line or cable. Then dig your post footings to a minimum 1.2 metres below finished grade — more if your municipality requires it. For Vaughan and northern Brampton, check with your local building department before you start.
Use Concrete, Not Compacted Gravel
Gravel-set posts shift. Concrete footings don't. Mix a standard 30 MPa concrete, pour it around a galvanized steel post sleeve, and let it cure at least 48 hours before loading the post. The cost difference between a gravel set and a proper concrete footing is roughly $75–$150 per post. That's cheap insurance against a $500 repair two winters from now.
Run Conduit to Code
All underground wiring should run through liquid-tight flexible metal conduit or rigid PVC conduit rated for direct burial. Run it below the frost line wherever possible. Where conduit must transition above grade, use weatherproof junction boxes with foam gaskets — not bare junction boxes with open knockouts.
licensed electrical services for outdoor wiring
Seal Every Connection
Use weatherproof wire nuts with dielectric grease on every connection inside exterior junction boxes. Wrap the box threads with self-fusing silicone tape. Check every connection annually in October before freeze-up. Thirty minutes of maintenance in the fall saves you a cold March troubleshooting session.
Choose Fixtures with the Right Ratings
Look for three things on the fixture spec sheet: IP65 or higher water rating, a "wet location" UL or CSA listing, and an explicit freeze rating or cold-temperature operating range that goes to at least -30°C. Most quality die-cast aluminum and brass fixtures from reputable Canadian suppliers meet all three.
Repair vs. Replace: How to Decide
Not every failed system needs a full teardown. Here's the decision framework we use for GTA clients.
Repair if:
- Fewer than 3 fixtures have failed
- The conduit and wiring are intact and dry inside
- Posts are still plumb or shifted less than 3 cm
- The system is less than 5 years old
Replace if:
- Half or more of the fixtures have failed within 24 months
- Any wiring shows corrosion, moisture infiltration, or brittle insulation
- Posts are leaning more than 5 cm or have rotted bases
- The original install used resin fixtures or unrated conduit throughout
- You're adding new circuits (ESA permit and licensed electrician required)
A partial repair on a fundamentally bad install is usually money wasted. If the footings are shallow and the conduit is unrated, those problems will keep producing failures no matter how many fixtures you swap out.
The Annual GTA Outdoor Lighting Maintenance Checklist
According to a 2023 report by the Insurance Bureau of Canada, outdoor electrical failures are among the leading causes of home insurance claims related to property damage in Ontario (Insurance Bureau of Canada, 2023). A simple annual inspection prevents most of them.
Do this every October, before hard freeze:
- Visually inspect every post for lean or movement
- Open junction boxes and check for moisture, corrosion, or loose connections
- Test every fixture for proper operation
- Check conduit entry points at grade level for cracking or separation
- Apply fresh water-repellent sealer to any exposed wood components
- Confirm all fixture lenses are intact with no cracking or hazing
Do this every April, after thaw:
- Re-check post plumb after frost heave season
- Look for conduit that has risen above grade level
- Check any above-grade conduit straps for loosening
- Test GFCI protection on outdoor circuits
Most homeowners in Mississauga and Toronto skip these checks entirely. The ones who do them spend a fraction of what repair-avoiders spend over a 10-year horizon.
Frequently Asked Questions
Why do my path lights keep failing every winter in Mississauga?
Path lights that fail every winter in Mississauga are almost always a fixture rating problem combined with a wiring issue. Standard path lights sold at big-box stores are typically rated IP44 — that handles rain but not the freeze-thaw cycling the GTA delivers. Upgrade to IP65-rated, freeze-rated path lights in die-cast aluminum or solid brass, and replace any wire connectors with weatherproof sealed splices. In our experience, that single switch eliminates the annual failure cycle for most homeowners. Budget $80–$200 per fixture for a lasting replacement in 2026.
Do I need a permit to fix my outdoor lighting in Ontario?
It depends on the scope. Replacing a like-for-like fixture on an existing circuit typically doesn't require a permit. However, adding a new circuit, moving wiring, or making any significant change to your outdoor electrical system requires an ESA Ontario permit and must be done by a licensed electrician (ESA Ontario, 2025). ESA inspection fees run $150–$350 on top of contractor labour. Skipping the permit puts your home insurance at risk and creates a liability issue if something goes wrong.
How deep do outdoor lighting posts need to be installed in Toronto?
In Toronto and across most of the GTA, posts must be set in concrete footings with a minimum depth of 1.2 metres below grade — that's the Ontario frost line standard. Some northern parts of Vaughan and Brampton have site-specific conditions that push this to 1.4 metres. Check with your local building department before digging. Footings shallower than the frost line will heave every winter without exception. A proper footing pour costs $300–$800 per post including labour in 2026 — far less than the damage a heaved post causes to conduit and wiring.
Can I fix outdoor lighting myself, or do I need an electrician in Ontario?
Low-voltage landscape lighting (12V systems) can often be maintained by homeowners — replacing fixtures, cleaning connections, trimming around cable runs. Standard 120V outdoor lighting is different. Any work on 120V circuits, breaker panels, or new circuit installation in Ontario requires a licensed electrician and an ESA permit. DIY work on 120V systems that isn't inspected can void your home insurance and create serious safety hazards. For anything beyond swapping a like-for-like fixture, hire a licensed contractor (ESA Ontario, 2025).
What's the best way to waterproof outdoor wiring connections in the GTA?
The most reliable method we use is a three-layer approach: weatherproof wire nuts filled with dielectric grease, self-fusing silicone tape over the connection, and the whole assembly housed in an IP65-rated weatherproof junction box with a foam gasket on the cover. This combination handles GTA freeze-thaw cycling, spring melt water, and direct rain exposure. It costs about $5–$15 in materials per connection point and has essentially zero failure rate over a 5-year window in our project experience.
The Bottom Line for GTA Homeowners
Outdoor lighting failure in Toronto, Mississauga, Vaughan, and Brampton isn't bad luck. It's predictable, and it's preventable. The freeze-thaw cycle will find every weak point in your system — shallow footings, unrated fixtures, open wiring connections, untreated wood. It always does, usually by the end of winter two.
The fix isn't complicated. Dig to the frost line. Use concrete. Run rated conduit. Choose IP65-rated, freeze-rated fixtures in die-cast aluminum or brass. Seal every connection. Inspect every fall and spring.
If your system has already failed, use the repair-vs-replace framework above to decide how deep to go. A partial repair on a fundamentally flawed install rarely holds. A properly rebuilt system, done to Ontario code with the right materials, will run cleanly for 15–20 years.
Our outdoor lighting services cover design, installation, and repair across the GTA — built to survive what Ontario winters actually deliver, not what the product box claims.
Tags
Related articles
Pick the Right Lumber and Fasteners for Outdoor Lighting or Pay the Price
Choosing the wrong lumber or fasteners for outdoor lighting setups can lead to costly failures. Learn what materials work best and which to avoid for lasting results.
Roofing in Toronto: Get It Done Before Mud Season Hits
The spring-to-mud-season window is the best time to replace or repair your roof in Toronto and the GTA. Learn 2026 CAD pricing, permit rules, and how to book before contractor slots fill up.
Why Most Outdoor Structures Fail After Two GTA Winters — And How to Stop It
After two winters in Toronto, the same failure patterns show up on decks, fences, and retaining walls across the GTA. Frost heave and wood rot are the culprits — and both are preventable with the right materials and build practices.